shipping & receiving
When you first boot up the computer, QuickBooks and World Ship will need to be opened from the desktop icons or in the bar at the bottom.
World Ship is our software for UPS shipping. QuickBooks is what we use for invoicing. They'll stay open and ready for the duration of the work week.
If you need help with either software and this page does not contain the needed information, you can reach out to Shawn (see the contact tablet on the General Info page). He'll be able to help you from there.
Tip: Click any image to open a full-size version
Shipping
We are ready to pack the finished products into shipping boxes according to the invoice now.
All of the products should be waiting to be packed on work tables in the warehouse. Refer to How to read invoices and make sure all items have been checked off if they are there.
How to tape boxes
When you're ready to physically start packing boxes, you'll have to decide what size box will fit what products. It's tough because we have so many different products that are changing all of the time. You'll have to experiment. Over time, you'll get a feel for how items can fit together and what size boxes you'll need.
Here are some examples:
- If you're packing all of the same kinds of items, it's much easier
- 4 8ct Display Boxes of Blister Packs fit perfect into a 8x8x8
- 12 10 or 20ct bottles fit into a 8x6x3
- 12 25 or 28ct Jugs fit into a 12x12x14
- 14 75ct Display Boxes fit into a 12x12x14
- If you discover more like this, please note them on a piece of paper or ask your manager to print out a "Common sizes" sheet.
- Sometimes you may be tempted to smush stuff becuase they almost fit, but please don't -- they need room to breathe and room for bubble wrap or peanuts.
- You can (and should) sometimes pack items into the smallest boxes possible, then place them in a larger box. For example, sometimes you may have a 12x12x14 and an 8x8x8. Instead of printing two UPS labels, place both of those boxes into a 16x16x24 and ship just one box.
Receiving
The Receiving responsibilities are quite simple -- if something comes into the warehouse, we make note of it and unpack and put it away.
When we receive supplies from U-Line or returns from customers, they usually arrive in the left-most bay, but sometimes they come from the back door or the front door. You'll have to keep an ear out for the doorbell and quickly check the front door.
Loading bay, warehouse area
If we get a large delivery from a truck, like U-Line, we'll hear the doorbell or banging on the garage door. You'll then go unlock the garage door with the two latches at the bottom left and right, then pull up the door.
Inspect what we've received, sign any documents needed, and then take note of what we've received in detail.
Front door
Similarly, small orders or items from Amazon or USPS will come to the front door. They'll ring the doorbell, you'll receive the items, sign if needed, and continue:
Whoever receives the items must post them to the Receiving Log on WhatsApp so that the owner and Shawn know, and to keep a record going of when, what time, and who received the items.
Keep documents
Any shipments we receive, typically come with some sort of documentation, aside from Amazon. Whoever receives the shipment should sign and date the document somewhere as well has take a photo or scan it with the printer. We'll then file the document in the manager's office.
Product manuals, warranty information, etc.
When we receive new equipment or products (think Printers or tablet counters), they nearly always come with a product manual and warranty card. We will be saving all of these into a file, currently located in the manager's office.
World Ship
This is the software we use to print UPS labels. There is a shortcut to open it on the desktop and in the bottom task bar.
You’ll always use this in conjunction with QuickBooks software that’s open on the left half of the screen and World Ship on the right so that you can reference the invoices needed to print shipping labels. You should also have the printed invoice with your marks (see above) with you.
With the invoice open on the computer on the left, you’ll first start by entering in the Customer name in the top left of the World Ship screen.
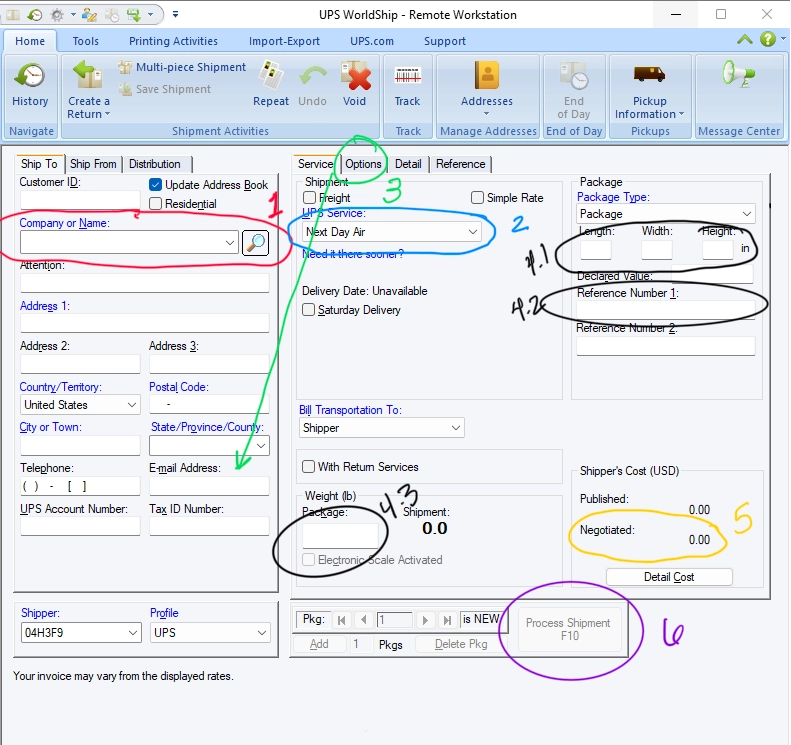
- Type the first few letters of the name of the customer from the SHIP TO box of the invoice (see image 1.1 above)
- If the customer already exists in our shipping software, it will appear in the dropdown below.
- If the customer does not exist, it will not appear and you will have to type in all the information manually.
- Please type the information exactly as it appears on the SHIP TO box of the invoice. It will automatically save it for next time.
- When you type in the zip code and click into the next box, it will sometimes auto-fill the city and state. Sometimes this will not match the invoice. If that happens, please change the city to match the invoice SHIP TO box.
- On the invoice, look at the bottom of the items below the shipping insurance for FREIGHT and look for the shipping method. If it doesn’t say anything, we always default to GROUND shipping.
- It will sometimes say NEXT DAY AIR or 2ND DAY AIR and if so that’s what you’ll select from the dropdown in World Ship. Again, always default to GROUND unless the invoice specifically says something else.
- NEXT DAY AIR on Fridays may require you to click “Saturday delivery” on World Ship. Ask your manager or look for notes on the invoice saying so. The default is to NOT check that box unless specifically told to.
- If the customer has an email address entered in their info on World Ship, you will see it with the rest of their address info. If they do, you’ll need to click Options tab (the green 3 on the first image)
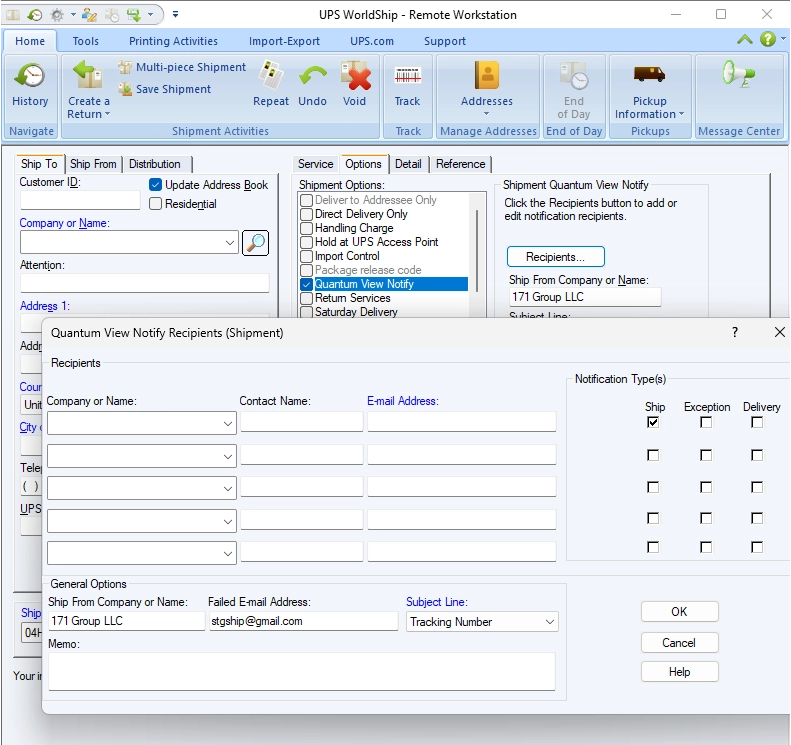
- After you’ve checked the Quantum View Notify box, click the button to the right that says Recipients…
- If they had an email address, the first row will have an email address entered there as well. You do not need to manually add one here.
- Check all of the boxes on the first row and any row that contains an email address.
- Do not change any other information
- Click OK, then click Services tab (next to Options, where you are now)
- Enter the shipping info
- Box Dimensions (If more than one box, enter the first box)
- Enter “R” (for reference) and then the INVOICE NUMBER in the Reference Number 1 text box.
- Put the weight of the shipping box here
- If there is more than 1 shipping box, click “ADD” below and it will allow you to repeat steps 4.1 to 4.3 for the next box. Repeat this until you’ve added all boxes for THIS SPECIFIC ORDER
- After all of the boxes and their information have been entered for this order, the Negotiated Shipping Cost will appear here.
- Take this number and add $5 to it either in your head (mental math!) or
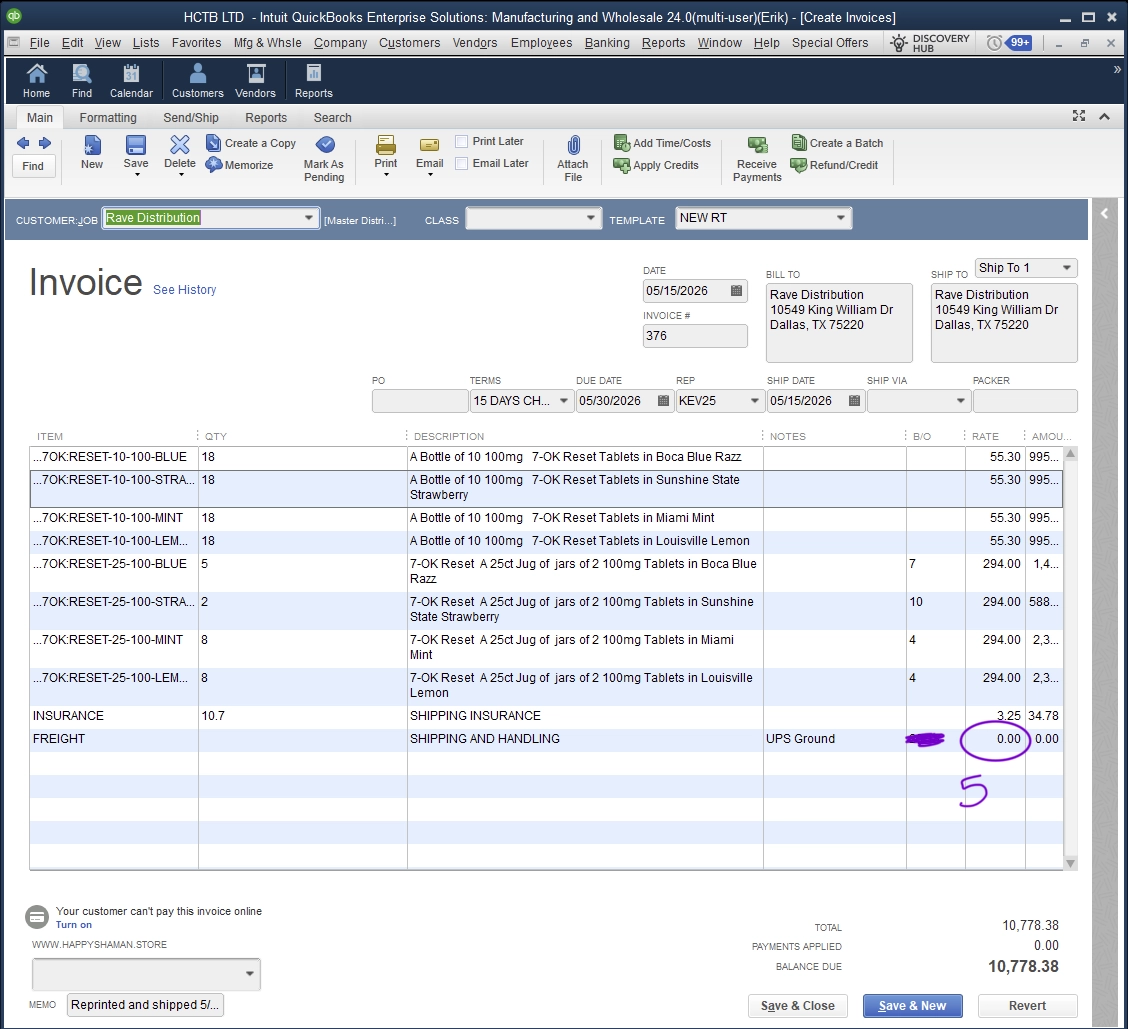
- In the invoice, erase the 0.00 (in the circled area in the image below) and type the Negotiated number + (the actual plus sign) 5 and hit enter. This will do the math for you and enter the final number
- You are now ready to print the UPS shipping label
- Proceed to finishing the QuickBooks part

QuickBooks & Invoices
Quickbooks will be open on the left side of the screen where you'll find invoices, create back orders, print orders, and look up customer information.
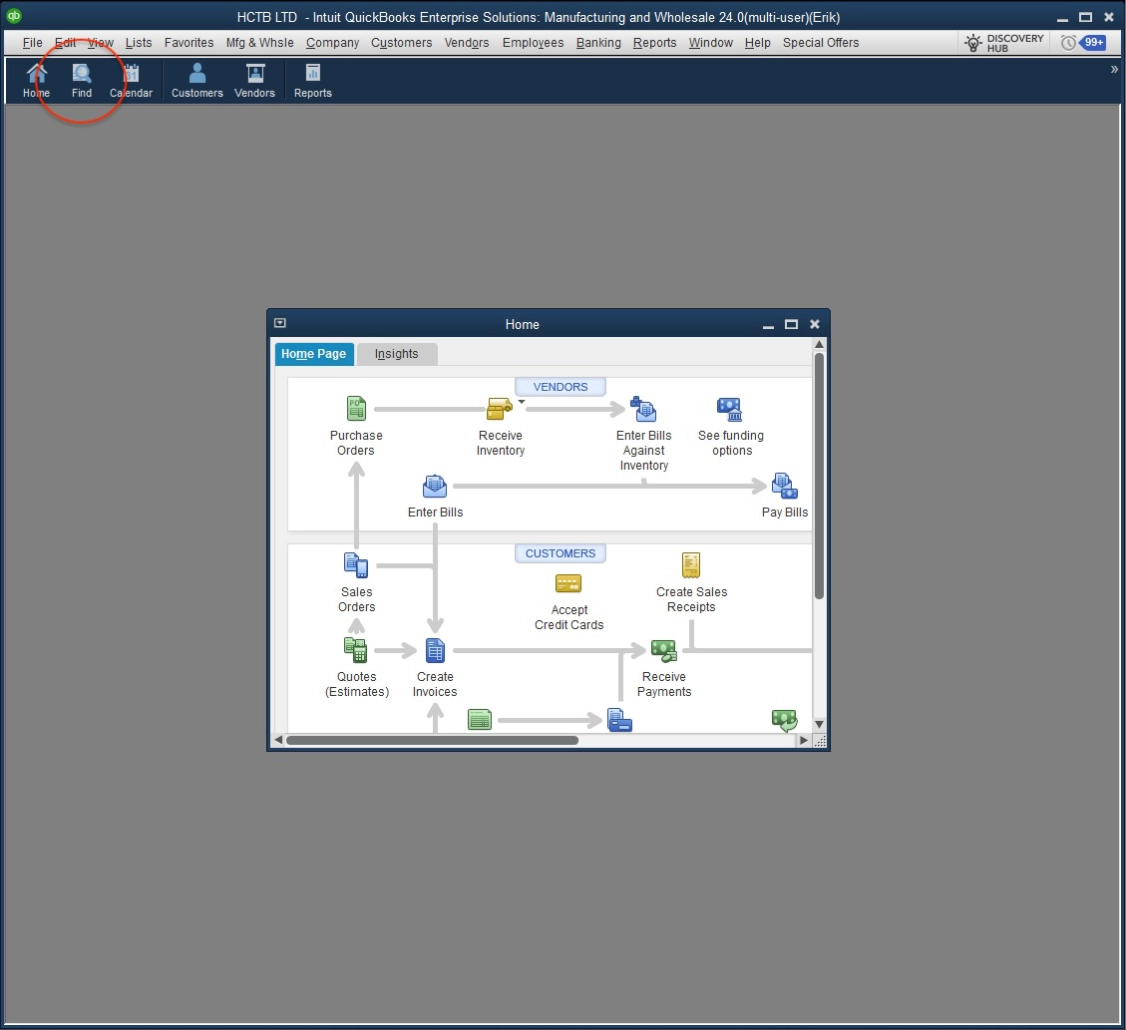
After you login, this is the first thing you'll see. In the red circle in the screenshot, you'll see Find. Click that to start.
This will open the primary screen you'll use to find invoices
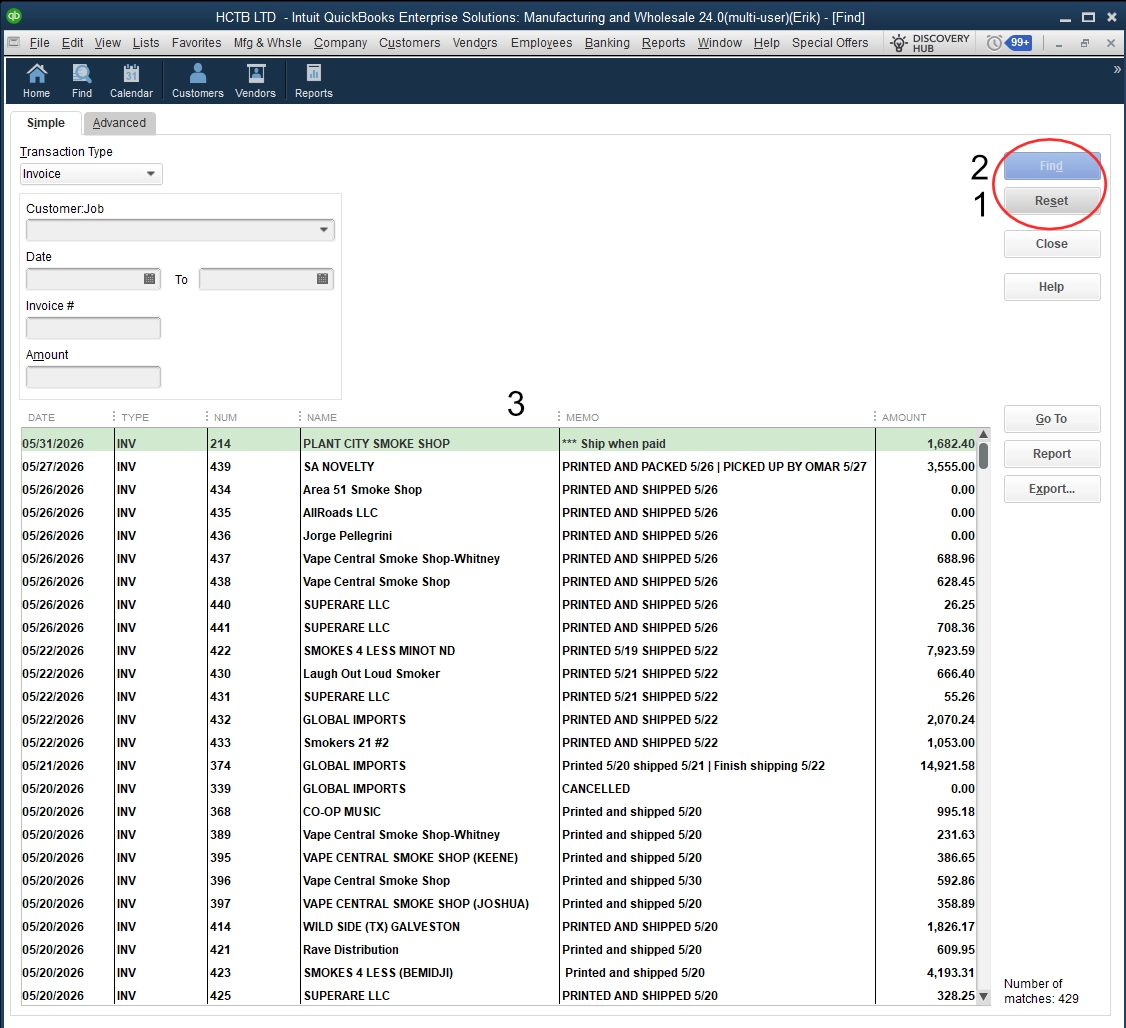
- Click Reset to clear everything
- Click Find to load all orders
- Find the item you're looking for and double-click on it to open
- All orders that have no been completed have some variation of the following in the Memo section:
- @ OK TO SHIP
- ok to ship
- *** PRINTED
- If it says "PRINTED AND SHIPPED" or "PRINTED AND PICKED UP" then that order has already been completed
- All orders that have no been completed have some variation of the following in the Memo section:
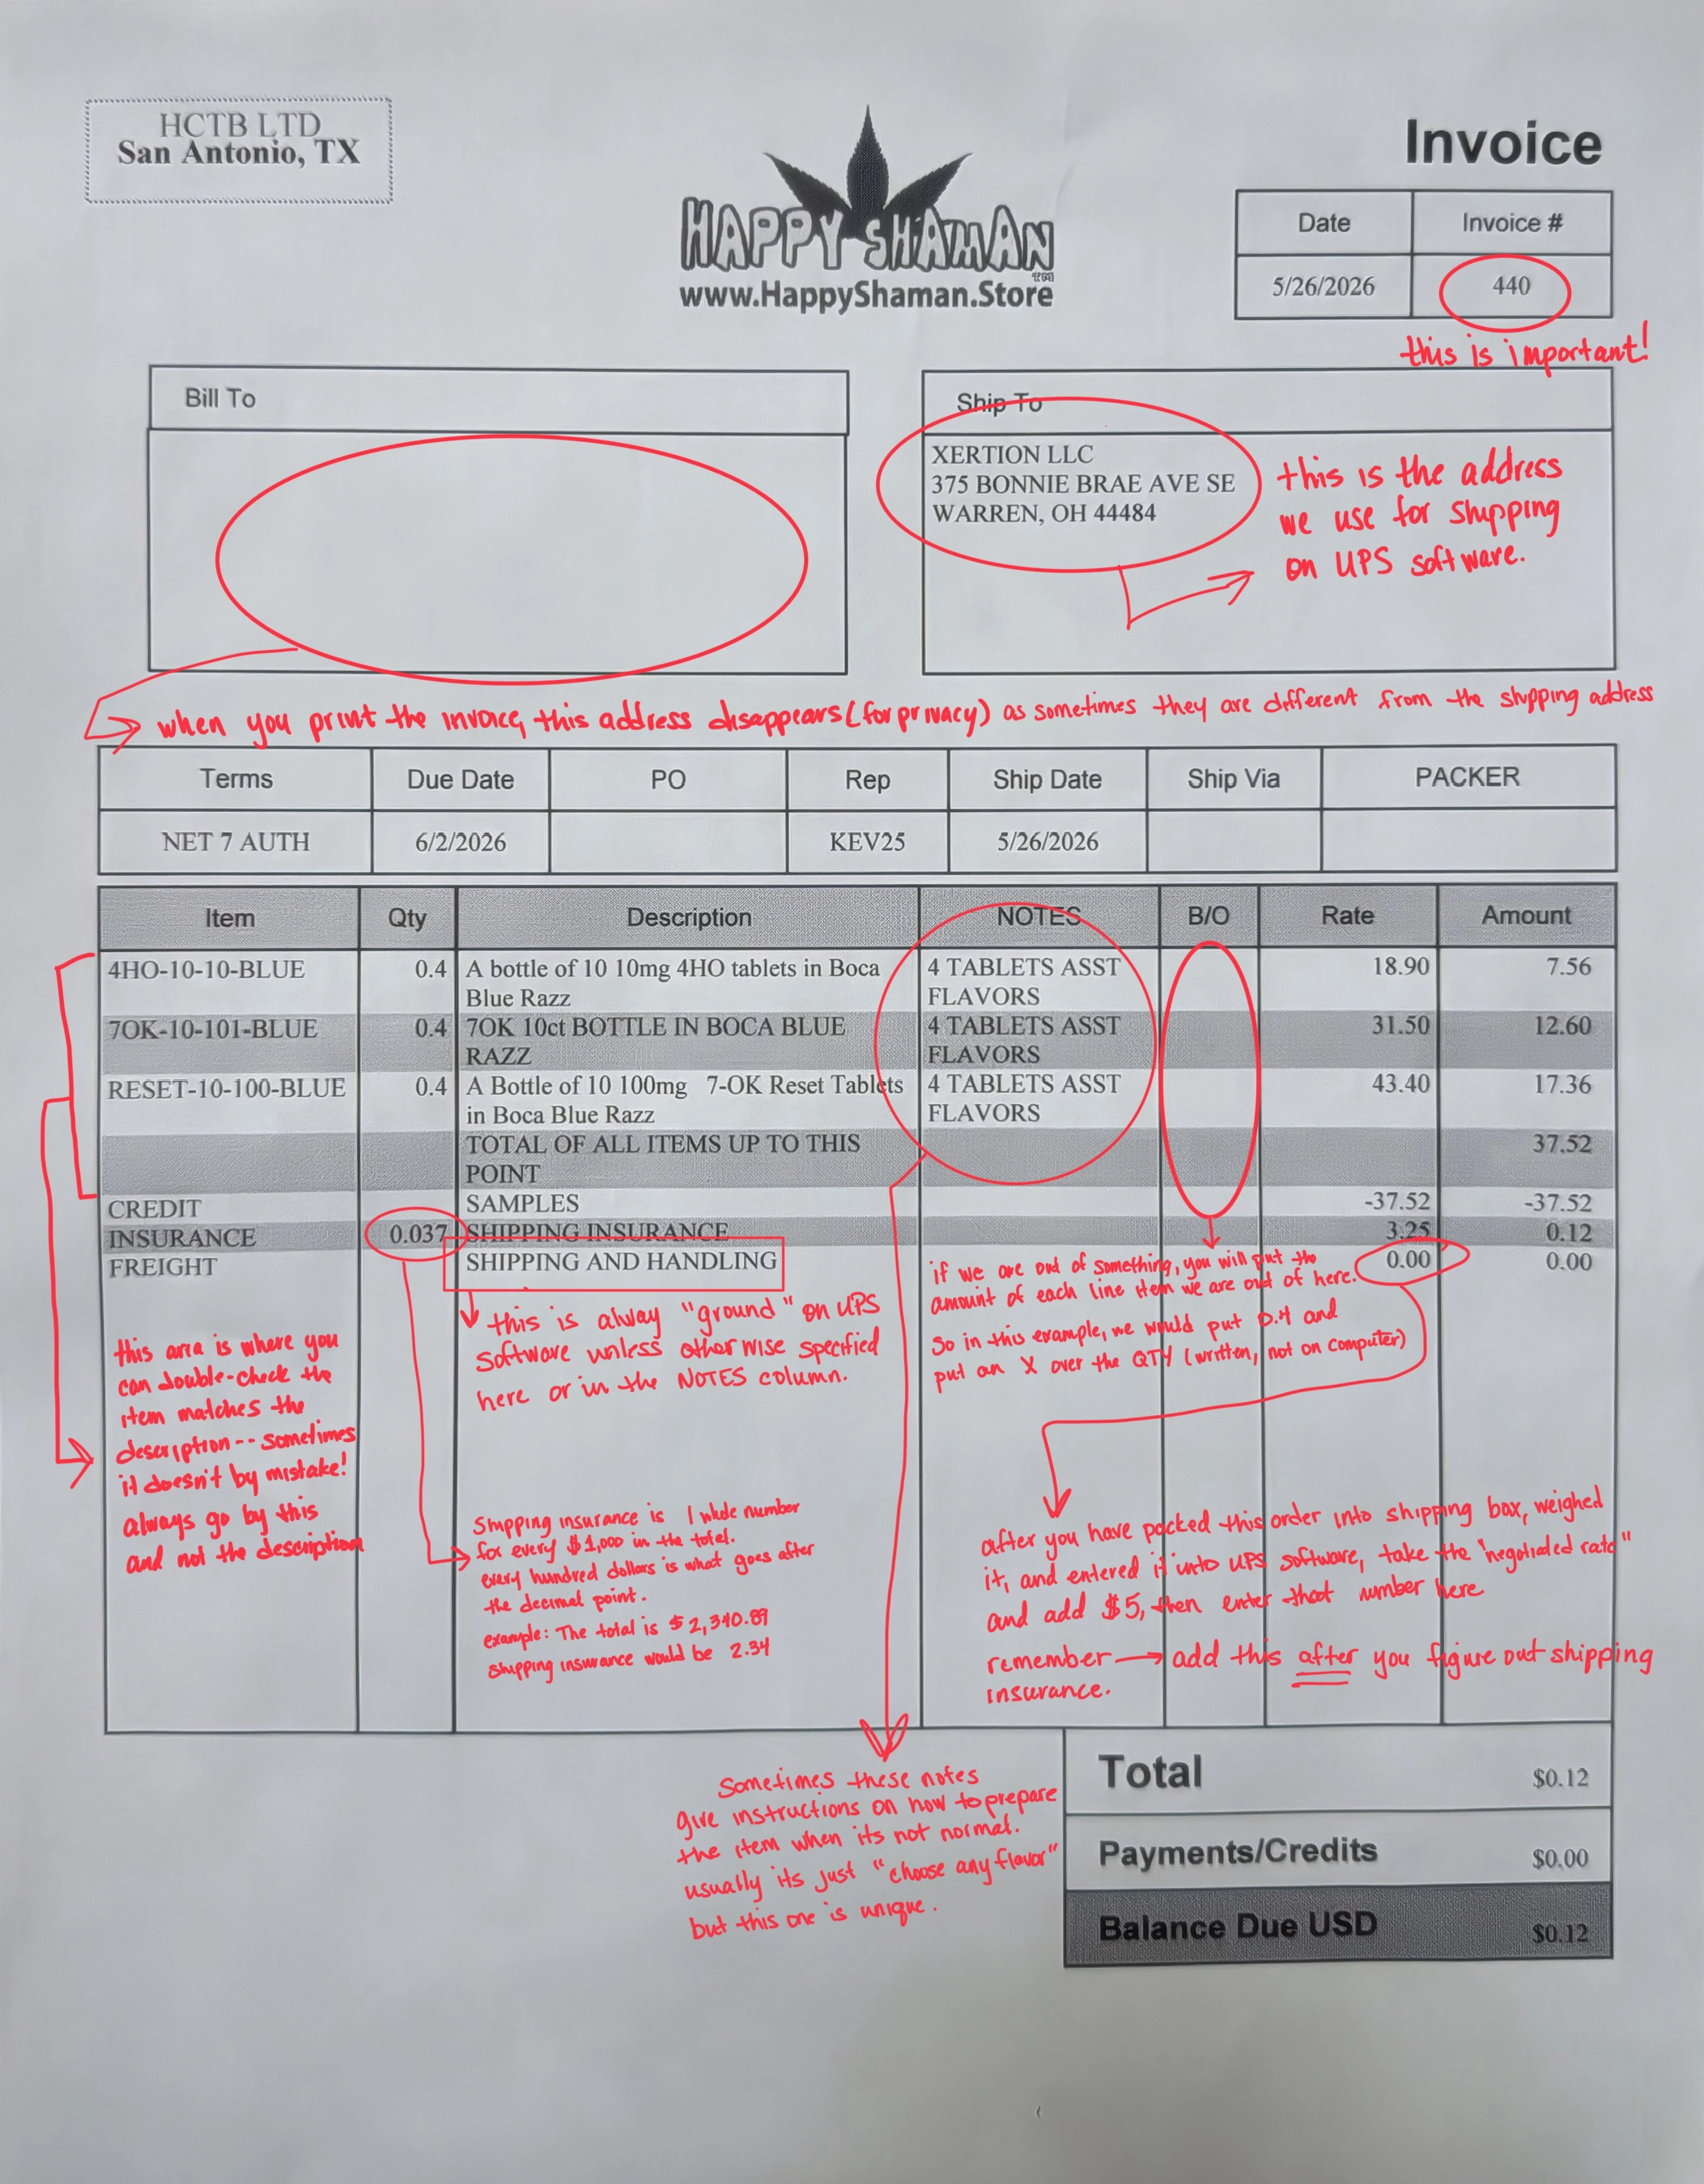
Reading invoices
Please review the image for more information on what to look for, what to change, and other information.
Click the image for a larger version for easier reading.
Backordering in QuickBooks
Sometimes we will have orders that we cannont fulfill completely and will have to backorder some items. This could be because we don't have thet tablets or we aren't able to make all of the items by the time UPS comes (for big orders).